Monday, 26 April 2021

SquashRebase

It’s simple – before you merge a feature branch back into your main branch (often master or develop), your feature branch should be squashed down to a single buildable commit, and then rebased from the up-to-date main branch. Here’s a breakdown.

Pull master branch

git pull origin master

Create bug/feature branch

git checkout -b branchName

Make changes as needed with as many commits that you need to. Make sure the final commit is buildable and all tests pass.

Get the number of commits from the start of your branch. There are a couple of ways to get this. You can simply git log and count your commits, or

git log --graph --decorate --pretty=oneline --abbrev-commit

which will show a graph of your commit log history and may be easier to visualize your commits. Sometimes you will have large enough number of commits that counting can become troublesome. In that case grab the SHA from the last commit that your branch branches from.

Squash to 1 commit.

git rebase -i HEAD~[NUMBER OF COMMITS]

OR

git rebase -i [SHA]

If you have previously pushed your code to a remote branch, you will need to force push.

git push origin branchName --force

Checkout master branch

git checkout master

Pull master branch

git pull origin master

Checkout bug/feature branch

git checkout branchName

Rebase from master

git rebase master

Handle any conflicts and make sure your code builds and all tests pass. Force push branch to remote.

git push origin branchName --force

Checkout, merge, and push into master

git checkout master

git merge branchName

git push origin master

Why should you adopt this workflow?

If you follow this process it guarantees that ALL commits in master build and pass tests. This simple fact makes debugging an issue much easier. You can use git bisect when trying to find the source of a bug. Git bisect becomes almost completely ineffective  if there are broken commits on the master branch; if you jump to a commit that isn’t clean, it’s difficult or impossible to tell if it introduced the bug.

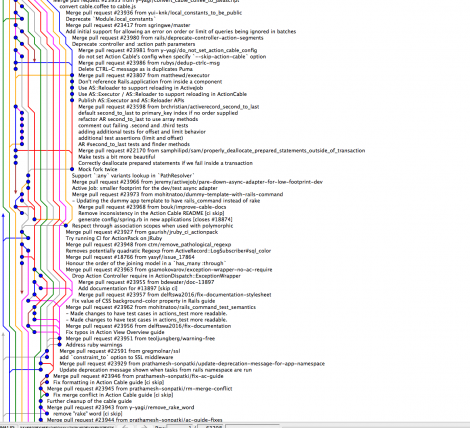
The process also cleans up your git log. Have you ever seen a git log graph that looks like this?

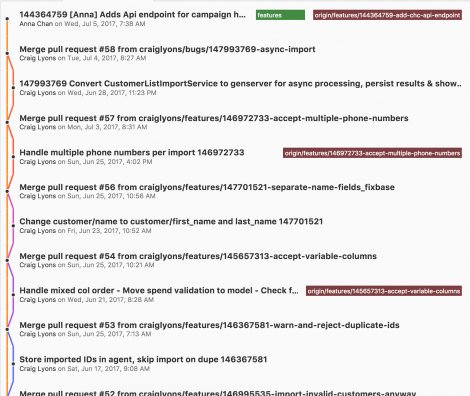
This is incredibly hard to discern what is going on, especially when you compare it to what my process makes the history look like:

Because each commit contains all the code for a feature or bug fix, you can easily see the whole unit of work in a commit, and you don’t have to  worry about checking out the correct commit from a branch.

My favorite outcome of this workflow is that it makes handling conflicts from rebasing simple. Since you’ve squashed down to one commit, you only have to deal with those conflicts once, rather than having to work against half-baked code. It reduces the risk of losing code when dealing with the conflicts.

So what are the drawbacks?

Since we’re squashing commits and rebasing, we are literally changing the history for the repository. Some people feel that history should reflect your true history, the good the bad and the ugly. I propose a clean history is more valuable than one that is hard to understand. Not all history is lost; diehards can still see the original history in the ref log. Another small drawback is that we lose some granularity when we squash our commits. If you really want to have multiple commits for a feature, at least squash down so that each commit builds and passes tests. While this workflow can be dangerous if you don’t have an understanding of what you are doing, after minimal education on the matter, this process is extremely safe.


Wednesday, 25 March 2015

Adobe Omniture Debugger configuration for tracking events on Webpage

1.Go to  http://blogs.adobe.com/digitalmarketing/analytics/meet-the-new-digitalpulse-debugger/

2.Just create a simple bookmark or favorite in your browser of choice (we’ve tested in IE, Firefox, Safari, and—your developer’s favorite—Chrome). Then, replace the URL of the bookmark with the following code (and make sure you get all of the code!):
  javascript:void(window.open(%22%22,%22dp_debugger%22,%22width=600,height=600,location=0,menubar=0,status=1,toolbar=0,resizable=1,scrollbars=1%22).document.write(%22%3Cscript%20language=\%22JavaScript\%22%20id=dbg%20src=\%22https://www.adobetag.com/d1/digitalpulsedebugger/live/DPD.js\%22%3E%3C/%22+%22script%3E%22));

Tuesday, 10 March 2015

Setting up Karma-Jasmine to run unit tests in PhantomJS and Chrome

Setting up Karma to run unit tests in PhantomJS and Chrome

Install NodeJS 
Node packages to install:
npm install -g karma-cli 
npm install -g karma --save-dev 
npm install -g phantomjs 
npm install -g karma-jasmine --save-dev 
npm install -g karma-phantomjs-launcher --save-dev 
npm install -g karma-chrome-launcher --save-dev
Install the last one only if you plan to run your unit tests using Chrome; you don’t need it if you prefer running them only in PhantomJS. Now, create the karma configuration file.
karma init karma.conf.js
To run karma: karma start karma.conf.js
For code coverage:

npm install -g karma-coverage
Example Unit test:
With Jasmine, we first describe our test suite, and then use it function to give our test case specification. In the spec, we expect the behaviors of our testing target. We also use beforeEachand afterEach to setup or tear down test environment for our spec.

Test Simple Controller

The best way to learn is to practice. Let's start with a very simple AngularJS controller, for my Aboutpage.
'use strict';

angular.module('jiwhizWeb').controller('AboutController',
['$rootScope', '$scope',
function($rootScope, $scope) {
    $rootScope.activeMenu = {
        'home' : '',
        'blog' : '',
        'about' : 'active',
        'contact' : '',
        'admin' : ''
    };
    $rootScope.showTitle = true;

    $rootScope.page_title = 'About Me';
    $rootScope.page_description = 'Here is my story.';
}
]);
This is the simplest page in my blog application, and no complex logic in the controller code. It only sets the active menu item, shows the title and sets page title with description.
The unit test for this controller will be also simple. We expect the page to do exactly what we designed, which are to set the "About" menu item as active, to show the title, and to have correct page title and description.
'use strict';

describe('Controller: public/AboutController', function() {

    var $rootScope, $scope, $controller;

    beforeEach(module('jiwhizWeb'));

    beforeEach(inject(function(_$rootScope_, _$controller_){
        $rootScope = _$rootScope_;
        $scope = $rootScope.$new();
        $controller = _$controller_;

        $controller('AboutController', {'$rootScope' : $rootScope, '$scope': $scope});
    }));

    it('should make about menu item active.', function() {
        expect($rootScope.activeMenu.about == 'active');
    });

    it('should show title.', function() {
        expect($rootScope.showTitle == true);
    });

    it('should have correct page title.', function() {
        expect($rootScope.page_title).toEqual('About Me');
    });

    it('should have correct page description.', function() {
        expect($rootScope.page_description).toEqual('Here is my story.');
    });
});
In unit test code, we call Jasmine function describe for our test suite, and we pass the suite title string and function of our test suite. And inside this suite function, we call Jasmine function it for our test specs, and we also pass the spec title string and spec function. Inside our spec functions, we call expect function with actual value, which is chained with a Matcher function, which takes the expected value. Here I used toEqual matcher function. See Jasmine Documentation for more matcher functions and how to define your custom matcher functions.
The first beforeEach is to load our application module - jiwhizWeb. And the secondbeforeEach is to inject dependencies from AngularJS, like $rootScope. Since we want to use same variable name "$rootScope" in our suite function, and let $rootScopebe used by our spec functions, we have to apply a trick, that is to use underscore to wrap the in-coming parameter_$rootScope_, and AngularJS Mock will correctly resolve it to the reference to actual$rootScope. We can use it to create our suite variable $scope by $scope = $rootScope.$new();. Last, we use $controller to initialize our AboutController and inject all dependencies.

Test Controller with Promise

OK, the AboutController is too simple. Let's try another more complicated controller,BlogListController, which uses promise to Consume RESTful API With Angular-HAL.
'use strict';

angular.module('jiwhizWeb').controller('BlogListController',
['$rootScope', '$scope', '$timeout', 'WebsiteService',
function($rootScope, $scope, $timeout, WebsiteService) {
    $rootScope.activeMenu = {
        'home' : '',
        'blog' : 'active',
        'about' : '',
        'contact' : '',
        'admin' : ''
    };
    $rootScope.showTitle = true;

    $rootScope.page_title = 'My Personal Blog';
    $rootScope.page_description = 'Some of my thoughts and experiences.';

    var setup = function( pageNumber ) {
        WebsiteService.load()
            .then( function( websiteResource ) {
                return websiteResource.$get('blogs', {'page': pageNumber, 'size':10, 'sort':null});
            })
            .then( function( resource )
            {
                $scope.page = resource.page;
                $scope.page.currentPage = $scope.page.number + 1;
                return resource.$get('blogPostList');
            })
            .then( function( blogPostList )
            {
                $scope.blogs = blogPostList;
                blogPostList.forEach( function( blog ) {
                    blog.contentFirstParagraph = getFirstSection(blog.content);

                    // load author profile
                    blog.$get('author').then(function(author) {
                        blog.author = author;
                    });

                });

            })
            ;

    };

    setup(0);

    $scope.selectBlogPage = function(pageNumber) {
        setup(pageNumber-1); //Spring HATEOAS page starts with 0
    };
}
]);
Here we have setup function to load list of blogs for specific page, and load each blog author. The challenge is how to test those chain of promises, which are asynchronous JavaScript operations. By searching Stack Overflow and reading other developers' blog, I found the way to use AngularJS$q.defer() to resolve the promise in unit test.
'use strict';

describe('Controller: public/BlogListController', function() {
    var $rootScope, $scope;
    var $controller, service;

    var mockWebsite = {
        $get: function(rel) {}
    };

    var mockResource = {
        page: {
            size: 10,
            totalElements: 100,
            totalPages: 4,
            number: 0
        },
        $get: function(rel) {}
    };

    var mockBlogPostList = [
        {
            title: 'Test Blog',
            content: '<p>This is first paragraph.</p> Other parts...',
            $get: function(rel) {}
        },
        {
            title: 'Another Blog',
            content: '<p>I came second.</p>',
            $get: function(rel) {}
        }
    ];

    var mockAuthor = {
        displayName: 'author'
    };

    beforeEach(module('jiwhizWeb'));

    beforeEach(inject(function(_$rootScope_, _$controller_, _$q_, _WebsiteService_) {
        $rootScope = _$rootScope_;
        $scope = $rootScope.$new();
        $controller = _$controller_;
        service = _WebsiteService_;

        var websiteDeferred = _$q_.defer();
        websiteDeferred.resolve(mockWebsite);
        spyOn(service, 'load').andReturn(websiteDeferred.promise);

        var blogsDeferred = _$q_.defer();
        blogsDeferred.resolve(mockResource);
        spyOn(mockWebsite, '$get').andReturn(blogsDeferred.promise);

        var blogListDeferred = _$q_.defer();
        blogListDeferred.resolve(mockBlogPostList);
        spyOn(mockResource, '$get').andReturn(blogListDeferred.promise);

        var authorDeferred = _$q_.defer();
        authorDeferred.resolve(mockAuthor);
        spyOn(mockBlogPostList[0], '$get').andReturn(authorDeferred.promise);
        spyOn(mockBlogPostList[1], '$get').andReturn(authorDeferred.promise);

        $controller('BlogListController',
            {'$rootScope' : $rootScope, '$scope': $scope, 'WebsiteService': service});
        $rootScope.$apply(); // promises are resolved/dispatched only on next $digest cycle
    }));

    it('should make Blog menu item active.', function() {
        expect($rootScope.activeMenu.blog == 'active');
    });

    it('should have selectBlogPage() function.', function() {
        expect($scope.selectBlogPage).toBeDefined();
    });

    describe('BlogListController setup(pageNumber) function', function() {

        it('should have currentPage set to 1.', function() {
            expect($scope.page.currentPage).toBe(1);
        });

        it('should have two blogs and first one is Test Blog.', function() {
            expect($scope.blogs.length).toEqual(2);
            expect($scope.blogs[0].title).toEqual('Test Blog');
        });

        it('should have first blog with title "Test Blog" and author "author"', function() {
            expect($scope.blogs[0].title).toEqual('Test Blog');
            expect($scope.blogs[0].author.displayName).toEqual('author');
        });

        it('should have second blog with title "Another Blog" and author "author"', function() {
            expect($scope.blogs[1].title).toEqual('Another Blog');
            expect($scope.blogs[1].author.displayName).toEqual('author');
        });

    });
});
The trick is to use AngularJS deferred object by calling $q.deferred(), and use deferred APIresolve(value) to return our mock resources. Then use Jasmine spyOn() function to stub our resource function and return promise object associated with the deferred object. After we setup all the mock up resources along the chain of promises, and initialize BlogListController, we have to do a final step $rootScope.$apply(); to trigger AngularJS $digest cycle programmatically, so our promises can be resolved.

Conclusion

Writing unit test is not easy. But it is so important, because writing unit test can actually make you think hard to write clean and elegant code.
With behavior-driven development, we can describe our test cases in a more understandable way, and it helps better communication between developers and business. Business can tell user stories, and developer can translate those stories into unit test, so when requirements change, we can easily find out what part of code we need to change as well.
My experience with BDD and Jasmine is very pleasant.
Monday, 27 January 2014

Running Hadoop examples on Cloudera Quickstart VM CDH4

Cloudera provides a very complete Quickstart VM, a downloadable image for VMWare, KVM or VirtualBox that contains everything to run a single-node Hadoop environment. It also includes the additional components like Hive, Zookeeper, etc.

1. Open a Terminal (Right-click on Desktop or click Terminal icon in the top toolbar)

2. Navigate to the Hadoop library directory:
cd /usr/lib/hadoop-mapreduce/


3. Execute the Hadoop jar command to run the WordCount example:
hadoop jar hadoop-mapreduce-examples.jar wordcount

4. The wordcount example complains that it needs input and output parameters.
 Usage: wordcount <in> <out>

5. Create one or more text files with a few words in it for testing, or use a log file:
echo "count these words for me hadoop" > /home/cloudera/file1
echo "hadoop counts words for me" > /home/cloudera/file2 

6. Create a directory on the HDFS file system:
hdfs dfs -mkdir /user/cloudera/input

7. Copy the files from local filesystem to the HDFS filesystem:
hdfs dfs -put /home/cloudera/file1 /user/cloudera/input
hdfs dfs -put /home/cloudera/file2 /user/cloudera/input

8. Run the Hadoop WordCount example with the input and output specified:
hadoop jar hadoop-mapreduce-examples.jar wordcount /user/cloudera/input /user/cloudera/output

9. Hadoop prints out a whole lot of logging information, after completion view the output directory:
hdfs dfs -ls /user/cloudera/output

10. Check the output file to see the results:
hdfs dfs -cat /user/cloudera/output/part-r-00000

Friday, 27 December 2013

Using PhantomJSDriver(),We can speedup selenium webdriver scripts execution

Example script:

import java.util.List;
import org.openqa.selenium.By;
import org.openqa.selenium.WebDriver;
import org.openqa.selenium.WebElement;
import org.openqa.selenium.firefox.FirefoxDriver;
import org.openqa.selenium.phantomjs.PhantomJSDriver;
import org.testng.annotations.Test;


public class TestPhantomJS {


@Test

public void GoogleSearch(){

WebDriver driver = new PhantomJSDriver();

//  WebDriver driver = new FirefoxDriver();

driver.get("http://google.com");

driver.findElement(By.name("q")).sendKeys("phantomjs");

driver.findElement(By.name("q")).submit();

List<WebElement> sites = driver.findElements(By.xpath("//cite"));

System.out.println(driver.getTitle());

int index=1;

for(WebElement site: sites){

String siteName=site.getText();

if(!siteName.equalsIgnoreCase(""))

System.out.println(index+++":--"+site.getText());

}

driver.close();

}


}

//Copied this from web

Most common functions using in Selenium WebDriver

  1. IsElementPresent/Text Present  function in Selenium WebDriver
    1. Finding elements by using function that take argument of By classprivate boolean isElementPresent(WebDriver driver, By by)
      try{
      driver.findElement(by);
      return true;
      }
      catch(Exception e)
      {
      return false;
      }
      }
    2. Using the size to decide whether element is there or not
      if(driver.findElements(Locator).size()>0
      {
      return true
      }else
      {
      return false
      }
      }
    3. Finding the text using the PageSourcedriver.PageSource.Contains("TEXT that you want to see on the page");
  2. Finding WebElement  by using various locators in WebDriver
    1. Using ID  WebElement welement = driver.findElement(By.id("Id from webpage"));
    2. Using Name  WebElement welement = driver.findElement(By.name("Name of WebElement"));
    3. Using Tag Name  WebElement welement = driver.findElement(By.tagName("tag name"));
    4. Using Xpath  WebElement welement = driver.findElement(By.xpath("xpath of  webElement"));
    5. Using CSS  WebElement welement = driver.findElement(By.CSS("CSS locator path"));
    6. Using LinkText  WebElement welement = driver.findElement(By.LinkText("LinkText"));
  3. Fetching pop-up message in Selenium-WebDriver
    this is the function that would help you in fetching the message

    public static String getPopupMessage(final WebDriver driver) {
    String message = null;
    try {
    Alert alert = driver.switchTo().alert();
    message = alert.getText();
    alert.accept();
    } catch (Exception e) {
    message = null;
    }
    System.out.println("message"+message);
    return message;
    }
  4. Canceling pop-up in Selenium-WebDriver
    public static String cancelPopupMessageBox(final WebDriver driver) {
    String message = null;
    try {
    Alert alert = driver.switchTo().alert();
    message = alert.getText();
    alert.dismiss();
    } catch (Exception e) {
    message = null;
    }
    return message;
    }
  5. Inserting string in Text Field in Selenium-WebDriverpublic static void insertText(WebDriver driver, By locator, String value) {
    WebElement field = driver.findElement(locator);
    field.clear();
    field.sendKeys(value);
    }
  6. Reading ToolTip text in in Selenium-WebDriver
    public static String tooltipText(WebDriver driver, By locator){
    String tooltip = driver.findElement(locator).getAttribute("title");
    return tooltip;
    }
  7. Selecting Radio Button in Selenium-WebDriver
    public static void selectRadioButton(WebDriver driver, By locator, String value){ List select = driver.findElements(locator);
    for (WebElement element : select)
    {
    if (element.getAttribute("value").equalsIgnoreCase(value)){
    element.click();
    }
    }
  8.  Selecting CheckBox in Selenium-WebDriver

    public static void selectCheckboxes(WebDriver driver, By locator,String value)
    {
    List abc = driver.findElements(locator);
    List list = new ArrayListArrays.asList(value.split(",")));
    for (String check : list){
    for (WebElement chk : abc){
    if(chk.getAttribute("value").equalsIgnoreCase(check)){
    chk.click();
    }}}}
  9. Selecting Dropdown in Selenium-WebDriverpublic static void selectDropdown(WebDriver driver, By locator, String value){
    new Select (driver.findElement(locator)).selectByVisibleText(value); }
  10. Selecting searched dropdown in Selenium-WebDriverpublic static void selectSearchDropdown(WebDriver driver, By locator, String value){
    driver.findElement(locator).click();
    driver.findElement(locator).sendKeys(value);
    driver.findElement(locator).sendKeys(Keys.TAB);
    }
  11. Uploading file using  Selenium-WebDriverpublic static void uploadFile(WebDriver driver, By locator, String path){
    driver.findElement(locator).sendKeys(path);
    }
  12. Downloading file in Selenium-WebDriverHere we will click on a link and will download the file with a predefined name at some specified location.
    public static void downloadFile(String href, String fileName) throws Exception{
    URL url = null;
    URLConnection con = null;
    int i;
    url = new URL(href);
    con = url.openConnection();
    // Here we are specifying the location where we really want to save the file.
    File file = new File(".//OutputData//" + fileName);
    BufferedInputStream bis = new BufferedInputStream(con.getInputStream());
    BufferedOutputStream bos = new BufferedOutputStream(
    new FileOutputStream(file));
    while ((i = bis.read()) != -1) {
    bos.write(i);
    }
    bos.flush();
    bis.close();
    }
  13. Handling multiple Pop ups 
    read  Handling Multiple Windows in WebDriver
  14. Wait() in Selenium-WebDriver
    1. Implicit Wait :
      driver.manage.timeouts().implicitlyWait(10,TimeUnit.SECONDS);
    2. Explicit Wait:WebDriverWait wait = new WebDriverWait(driver,10);
      wait.until(ExpectedConditons.elementToBeClickable(By.id/xpath/name("locator"));
    3.  Using Sleep method of java
      Thread.sleep(time in milisecond)
  15. Navigation method of WebDriver Interface
    1. to() method (its a alternative of get() method)
      driver.navigate().to(Url);
      This will open the URL that you have inserted as argument
    2. back() – use to navigate one step back from current position in recent history syntax == driver.navigate().back();
    3. forward() – use to navigate one step forward in browser historydriver.navigate().forward();
    4. refresh() – This will refresh you current open urldriver.navigate().refresh();
  16. Deleting all Cookies before doing any kind of action  driver.manage().deleteAllCookies();
    This will delete all cookies
  17. Pressing any Keyboard key using Action builder class of WebDriverWebDriver has rewarded us with one class Action to handle all keyboard and Mouse action. While creating a action builder its constructor takes WebDriver as argument. Here I am taking example of pressing Control key
    Actions builder = new Actions(driver);
    builder.keyDown(Keys.CONTROL).click(someElement).click(someOtherElement).keyUp(Keys.CONTROL).build().perform();
    When we press multiple keys or action together then we need to bind all in a single command by using build() method and perform() method intend us to perform the action.
    In the same way you can handle other key actions.
  18. Drag and Drop action in Webdriver
    In this we need to specify both WebElement  like Source and target and for draganddrop Action class has a method with two argument so let see how it normally look like
    WebElement element = driver.findElement(By.name("source"));
    WebElement target = driver.findElement(By.name("target"));
    (new Actions(driver)).dragAndDrop(element, target).perform();
  19. Reference site
    http://selenium.googlecode.com/git/docs/api/java/org/openqa/selenium/
  20. http://abodeqa.wordpress.com/2013/09/18/webdrivers-most-popular-commands/